How-to Guides
Our team at Epic Traffic Bot Pro has prepared a number of how-to guides to walk you through the most common use cases for our application. If you don't see what you're looking for listed in the table of contents below, please see our Scripting Tutorials or general documentation.
How to install and register Epic Traffic Bot Pro
This guide will demonstrate how to install and register your copy of Epic Traffic Bot Pro.
Installing Epic Traffic Bot Pro
After purchasing Epic Traffic Bot Pro, you will receive a confirmation email. This email will contain your credentials along with a link to download the latest version of the application.

Follow these steps to download Epic Traffic Bot Pro:
- Click on the download link provided in the email.
- Click the Download Epic Traffic Bot Pro button.

- Extract the zip files under a folder like Documents, Desktop, or somewhere similar. Avoid extracting the .zip file on a high permission folder like Program Files, this can cause permission issues and other unwanted behaviour within the application.
Registering Epic Traffic Bot Pro
You need to register a valid license in order to use Epic Traffic Bot Pro. Once you register the application using your PC, Epic Traffic Bot Pro will be bound to that PC. If you need to reset your license, you can do so by entering your credentials here.
After purchasing Epic Traffic Bot Pro, you will receive a confirmation email. This email will contain your credentials along with a link to download the latest version of the application.
To successfully complete the registration of your software, complete the following steps:
- Open the PayPal purchase confirmation email you received when you purchased the software.
- Copy the credentials from the email. You should see three items:
- A username
- A password
- A serial key
- Launch the Epic Traffic Bot application.
- Enter your credentials into the relevant fields:

Congratulations, you have successfully installed and registered Epic Traffic Bot Pro!
How to set up your first traffic run
This guide will teach you how to simulate web traffic to a website of your choice. Let's start by setting the website we want to send traffic to.
Selecting the website to send traffic to
Follow these steps to set up the destination website in Epic Traffic Bot Pro:
- Make sure you are on the Main screen of Epic Traffic Bot Pro.
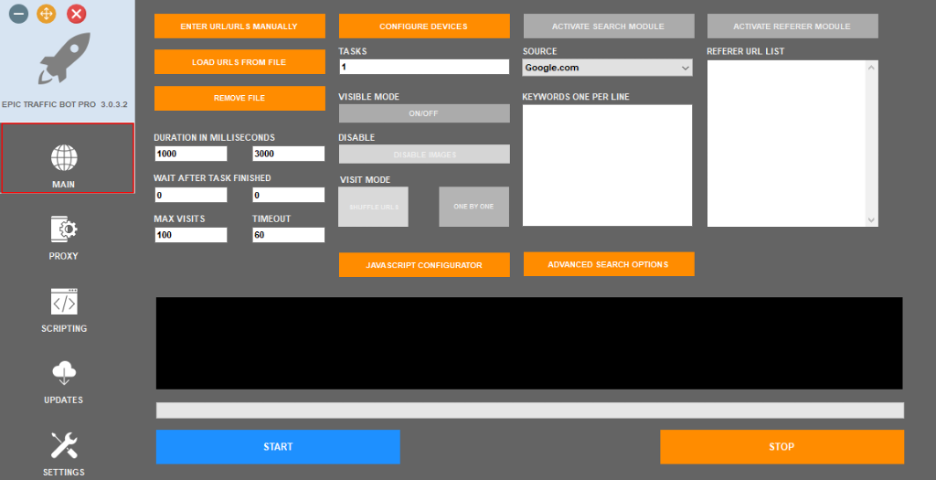
- Click on Enter URL/URLs Manually.

- Type the URL of your website in the text box provided. In this case, we'll use: https://epictrafficbot.com/click-element/
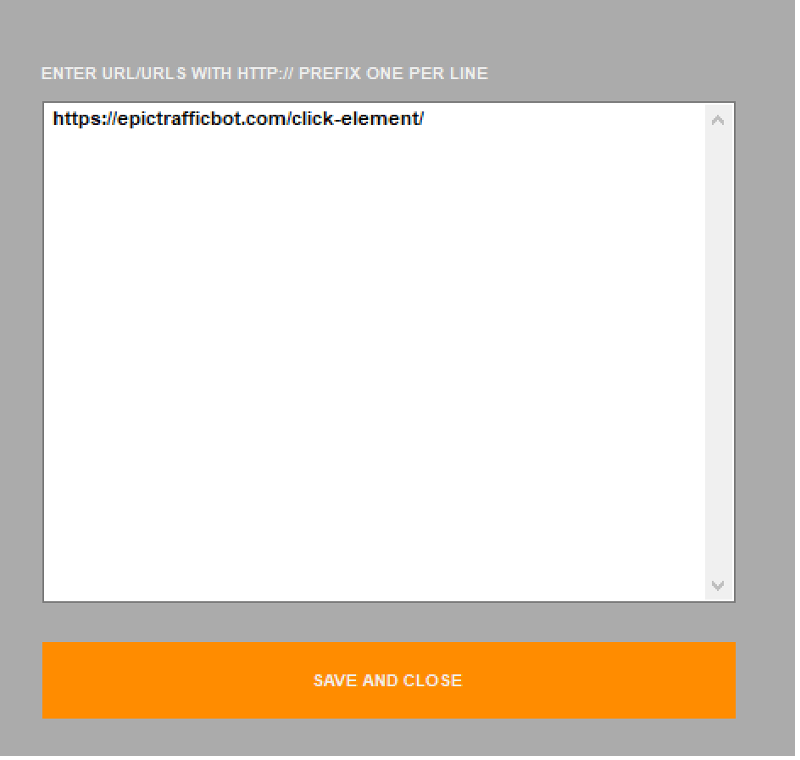
- Click the Save And Close button.
You have now successfully set the destination website. This is where Epic Traffic Bot Pro will send the web traffic. Let's set how many times we want to Epic Traffic Bot Pro to visit the destination website.
Set the number of visitors you want for your site
You can set the number of visits to your site using the Max Visits field on the Main screen.
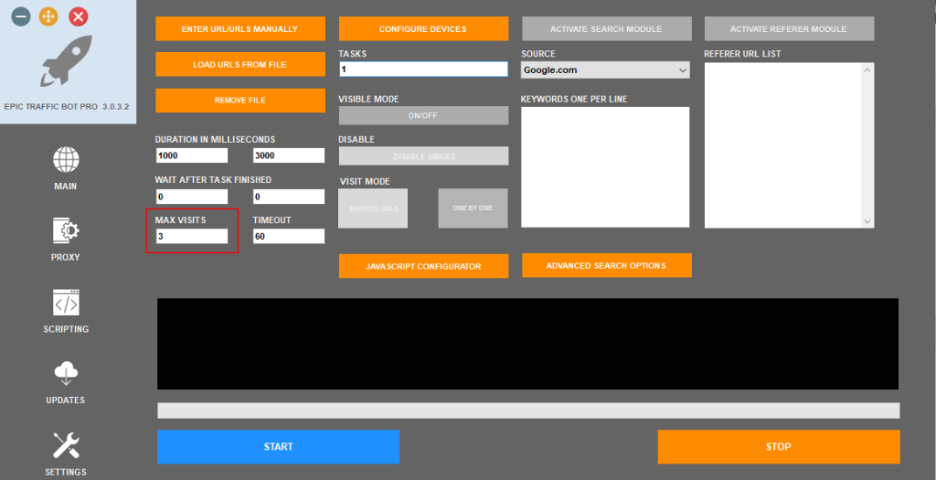
For this example, let's set the value of Max Visits to be 3.

With this in place, Epic Traffic Bot Pro will visit the website three times.
See your task run in the browser
If you want to see Epic Traffic Bot Pro perform actions in the browser, like visiting a webpage and clicking buttons, you will have to change the Visible Mode setting. This setting is set to Off by default to boost the performance of the application. See the possible states for Visible Mode below:


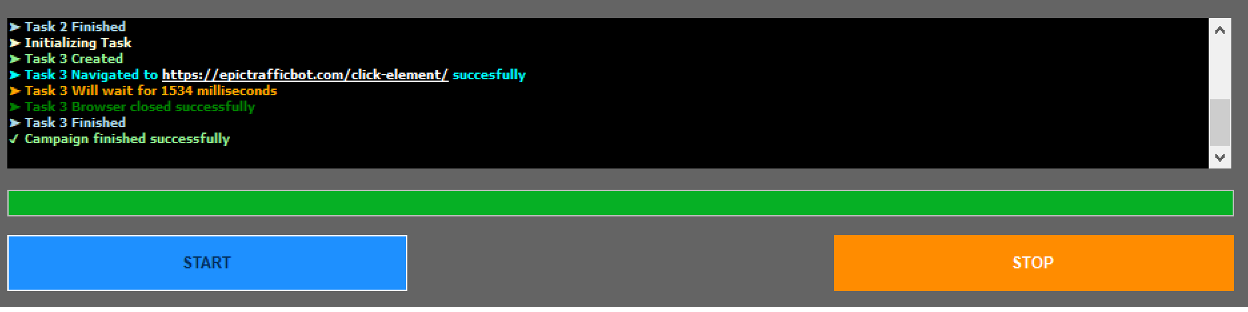
Click the Start button on the main screen to begin your task:

You should see task 3 times. After the final task has been completed, a message stating the Campaign has finished should appear in the console.
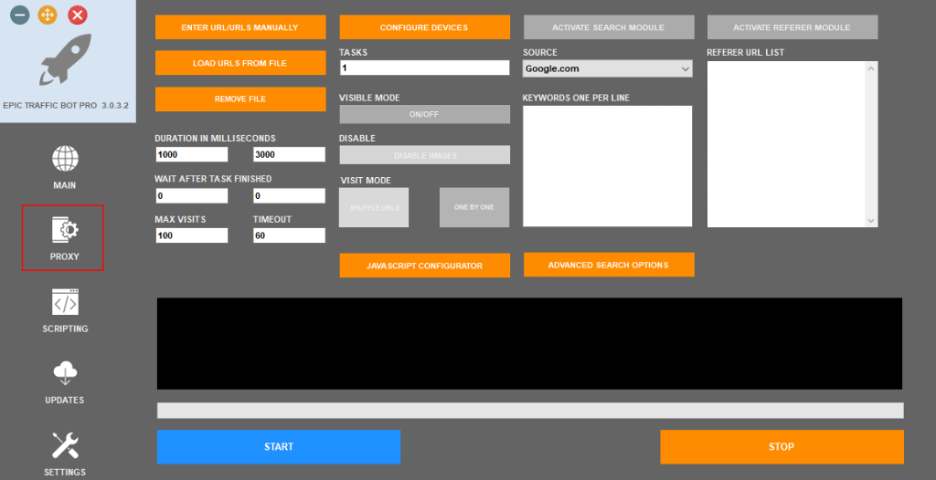
This how-to guide will demonstrate how to use a proxy of your choice with Epic Traffic Bot Pro.
Click on the Proxy tab on the Main screen to begin:
Using your own public Proxy in Epic Traffic Bot Pro
Follow these steps you use a specific public proxy in Epic Traffic Bot Pro:
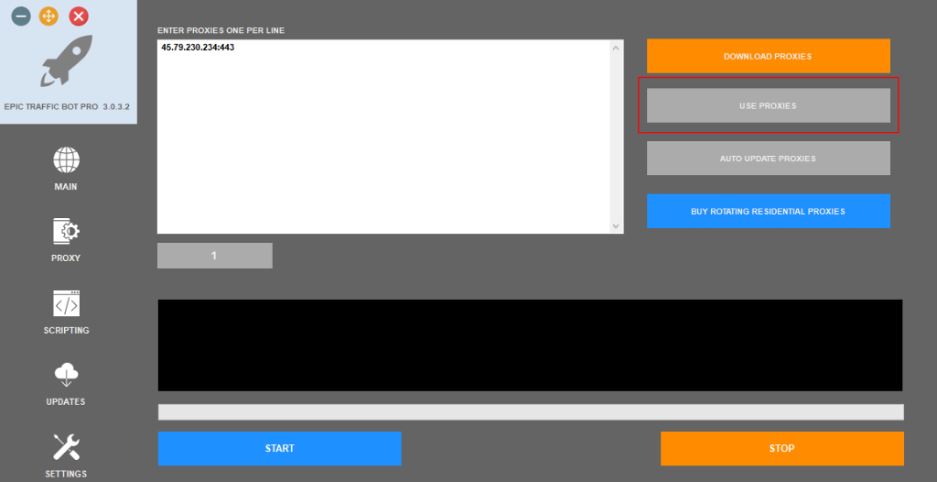
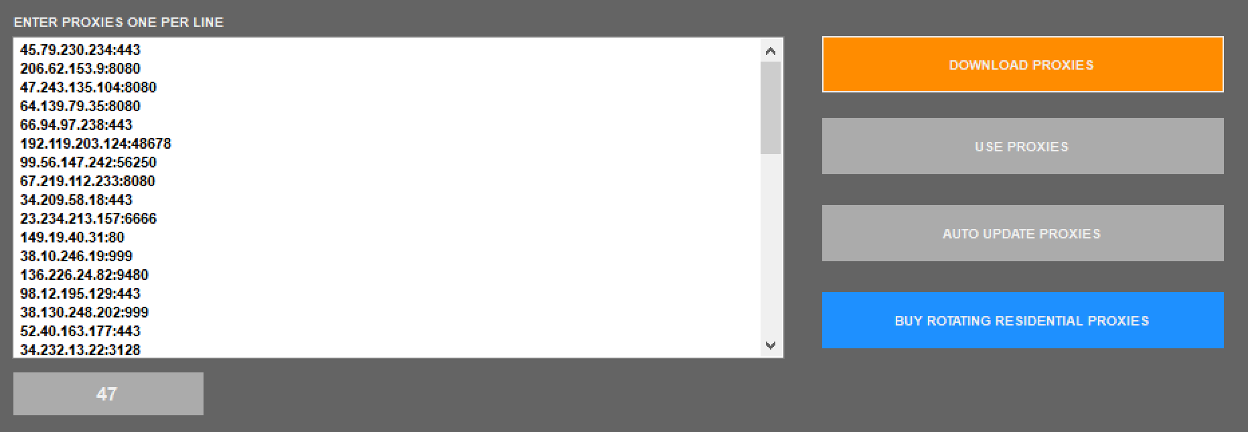
- If you have a specific proxy you would like to use with our application, you can do so by entering the address of that proxy into the text box provided:
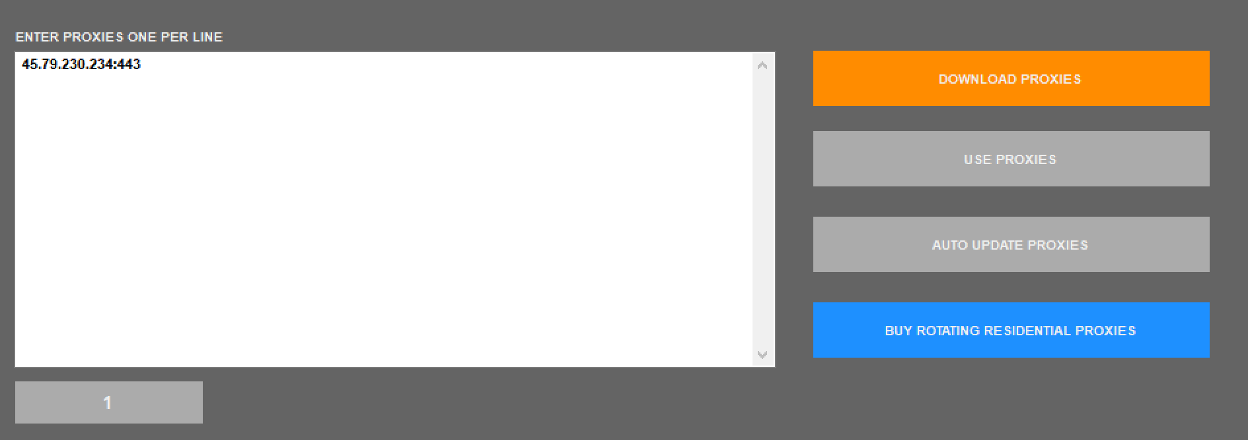
As you can see the count of proxies is also displayed below the text box.
- Click on the Use Proxies button so Epic Traffic Bot uses this proxy when performing tasks.
Using free public proxies provided through Epic Traffic Bot Pro
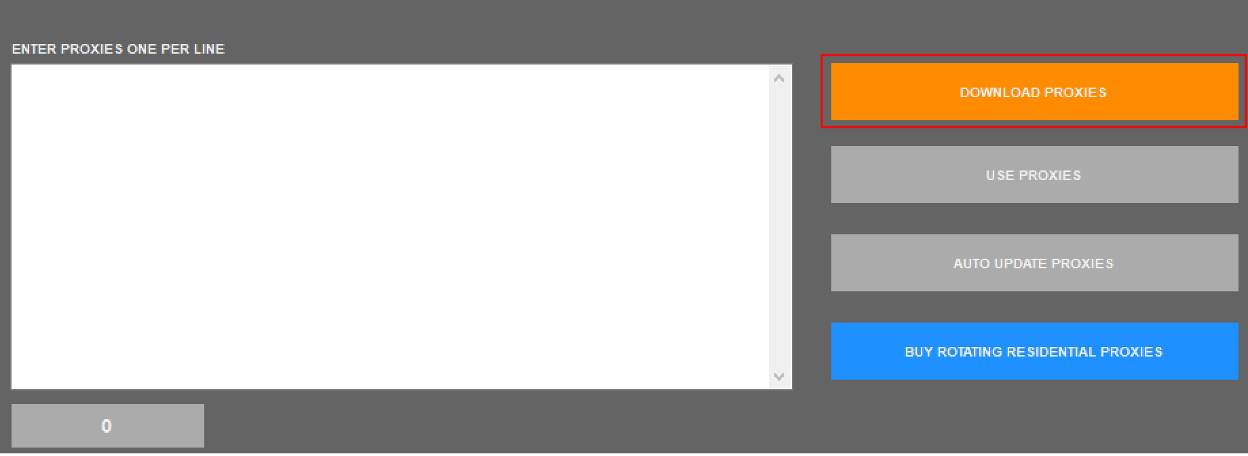
If you want to use free public proxies, but you don't need to use your own proxy with a specific address you can make use of our Download Proxies feature. To use these public proxies, follow these steps:
- Click the Download Proxies button.
- Select the country of origin for your proxies from the options shown.
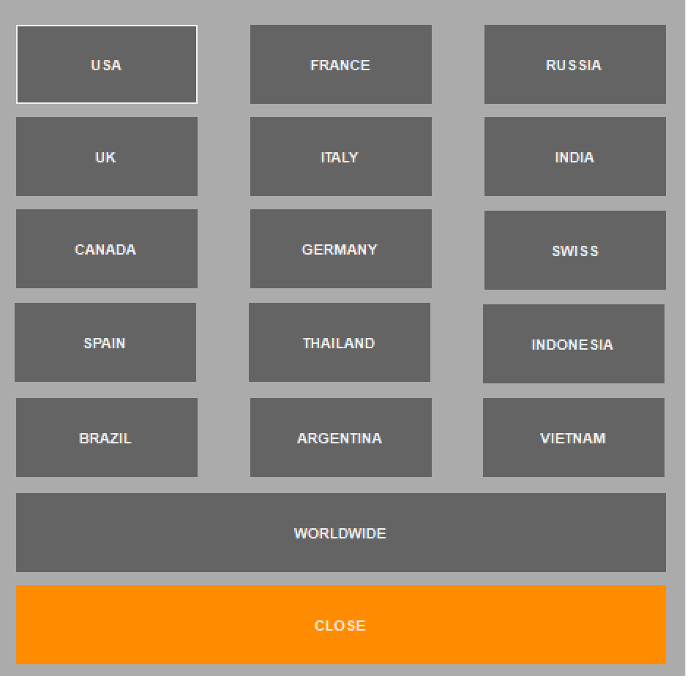
- You should now see the list of proxies populate the text box.
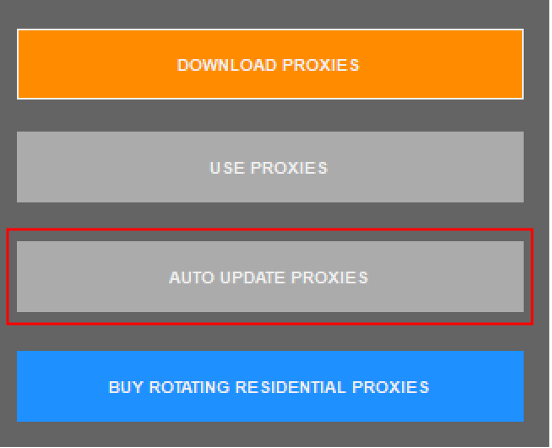
- Decide whether you want to automatically update proxies. If you click the Auto Update Proxies button, the list of proxies will get automatically updated with new proxies every 5 minutes.
- Click on the Use Proxies button so Epic Traffic Bot uses this proxy when performing tasks.
How to set up a script to run with Epic Traffic Bot Pro
This how-to guide demonstrates how to run a basic script using Epic Traffic Bot Pro
For this example, we will tell our bot to click the Take Me to the Offer button located on our home page https://epictrafficbot.com/:

Finding the XPath of an element
Follow these steps to find the XPath of the Take Me to the Offer button:
- Open your browser and navigate to https://epictrafficbot.com/.
- Right-click and Inspect the Take Me to the Offer button:
- Right-click on the HTML for the search bar in your inspection view. Copy the Xpath. See the screenshot below for details:

- Paste the value of this XPath into the identifier field.

Running your script
- Click on the Main button in the Epic Traffic Bot Pro Navigation Pane.
- Click on the Enter URL/URLs Manually button.
- Enter the URL: https://epictrafficbot.com/

- Finally, navigate back to the Main screen and turn Visible Mode on. This will allow us to view our code in action.
- Click Start at the bottom of the screen.
- You should now see your task in the console. Your browser should open, navigate to https://epictrafficbot.com/ and click the offer button!
For more information and tutorials on scripting visit our Scripting Tutorials page.
How to download custom scripts
I assume this is Premium Scripts? Please correct me if I'm wrong. There are a number of custom scripts available for download through Epic Traffic Bot Pro. Downloading these scripts will save you from having to write the script yourself.
Loading a custom script
Go to Scripting tab.
Click Premium Scripts
Read the title and description of the script to decide whether it is the correct script for your use case.
Click Import Script
Running your Custom Script
Select your script
Click the Load Script button
Set your URL in Enter URL
Turn visible mode on to see script in action
Start Task
How to use the Search Module
This how-to guide will explain what the Search Module is, how to use it, and some common mistakes to avoid when using the tool. Let's get started!
What is the Search Module?
On the Main Screen of Epic Traffic Bot Pro, you will see the Search Module section:

The Search Module works like so:
- Epic Traffic Bot Pro will perform a search for your keywords on the selected browser, or Source, field like Google.com.
- For example, if you entered the keyword "programming tutorials", the application will search for this term on Google.
- A search is performed and the results are displayed.
- Epic Traffic Bot Pro will then try to find the URL you entered in the Enter URL/URLs Manually section.
- If the application finds the URL on page 1 of Google results, the application will output the message "Found link on page 7 of Google" to the console.
- If the application does not find the URL on page 1 of Google results, it will navigate to page 2 of the results.
This process is repeated until you hit the page limit you have set in Advanced Search Options. We'll demonstrate this in more detail with an example you can follow along with.
Find out where a webpage ranks for a specific search term
Let's go through an end-to-end use case for the Search Module which will demonstrate the power and flexibility of this tool.
Our use case is as follows:
We want to find out where the page https://www.w3schools.com/ ranks on Google.com for 3 specific search terms:
- programming tutorials
- tutorials for programming
- learn to program
Let's look at how we can accomplish this:
Set the webpage you want to see the ranking result of in the Enter URL/URLs Manually section. We recommend using only one URL when using the Search module.

Click the Activate Search Module button.

Set your Source. This will be the browser used to search for your keywords.

Enter your keyword terms. Enter one term on each line. For this example, enter the terms:
- programming tutorials
- tutorials for programming
- learn to program.

Go to Advanced Search Options

Set the number of pages of search results you want to iterate through. If set to 10, the application will go through 10 pages of search results looking for https://www.w3schools.com/ for each of our keywords.

Change the other Advanced Search Options if you wish. Here are the definitions for the remaining options:
- Click percentage on website if found: The percentage chance of clicking the website if the website is found for that keyword. For example, if you put 5, it will be 5%. That means that only 5% of the tasks will click the website)
- Duration to stay on each page: How much time the bot will stay on each page of search results before going to the next page.
- Click Save And Close.
- Enable Visible Mode so we can see Epic Traffic Bot Pro in action!

- Click on Start.

Your browser should open. You should see Google search for your keywords. When I ran this task the website https://www.w3schools.com/ ranked on page 7 of Google for the search term "programming tutorials".
Experiment with different keywords and websites more applicable to your specific use case or scenario. Here are some common mistakes to avoid and things to look out for when using the Search Module.
Common mistakes to avoid when using the Search Module
Some things to remember when using this tool:
- We recommend only putting 1 URL in the Enter URL/URLs Manually section when using the search module.
- Remember to put the trailing / at the end of homepages, eg. https://www.msn.com/
- We do not recommend using this feature if you do not have paid residential proxies. The proxies that are included with this product are free, public proxies. It will result in a lot of captchas being flagged. Check out our documentation on when to use rotating residential proxies and how to avoid Captchas.
Epic Traffic Bot Pro Documentation
Welcome to the official documentation of Epic Traffic Bot Pro.
[toc]
Getting Started
Thank you for purchasing Epic Traffic Bot Pro! The first thing you have to do before you can start automating website actions and driving traffic to your sites is to register your new software.
Registering your software
Note that when you register your purchased software, it will be linked to the PC/device you used at the time of registration. If you need to reset your license, you can do so by navigating to your EpicTrafficBot dashboard and unlinking the machine from there.
To successfully complete the registration of your software, complete the following steps:
Open the PayPal purchase confirmation email you received when you purchased the software.
Copy the credentials from this email. You should see three items:
a. Your username, which is the same as your e-mail address that you signed up with.
b. Your password, which is the same as the one you set for the EpicTrafficBot website.
Launch the Epic Traffic Bot application.
Enter your credentials into the relevant fields:

The Epic Traffic Bot Pro Dashboard
When you launch the application you will be greeted by the Epic Traffic Bot Pro dashboard. This is the main hub of the tool and allows you to perform many different actions and navigate to different parts of the app.
One of the first things you’ll notice is the Epic Traffic Pro Navigation Pane on the left side of the user interface.
Epic Traffic Bot Pro Navigation Pane
The Epic Traffic Bot Pro Navigation Pane allows you to navigate to the 5 main sections of the application. These 5 sections are:
- Main - this section allows you to send mass traffic to websites and automate tasks.
- Proxy - download new free public proxies and configure the existing proxies you want to use for your task
- Scripting - Configure scripts that automate web tasks.
- Updates - Checks whether Epic Traffic Bot Pro is up-to-date.
- Settings - Make changes to the settings of the application, clean the resources, and more.
Main
The Main screen allows you to configure the job parameters required for your automated task. This includes:
- Setting time between tasks,
- Setting which devices to use for your job,
- Declare what URLs you would like to visit or send traffic to, and much more!

Let’s go into more detail about each field that is shown on the main screen.
Enter URL/URLs Manually
Allows you to the URL or URLs you would like to visit, send traffic to, or perform automated actions on.
To accomplish this:
- Click the Enter URL/URLs Manually button.

- Type or copy and paste in your desired URLs, eg. https://google.com.

- Make sure there is only one URL per line.
- Click Save and Close.
Load URL/URLs From File
Allows you to upload a .txt file containing your URLs instead of manually entering them individually.
Remove File
Clicking this button will remove the URL file you previously uploaded using the Load URL/URLs From File function. This causes the application to revert back to using the manually entered URLs that you configured here.
Duration in milliseconds
The scheduler waits for a random time between the minimum and maximum times you set here. Once the scheduler is done waiting, the task starts. The wait occurs before the script is run.
For the example shown below, the task will be executed at a random time between 1 and 3 seconds (milliseconds are equal to 1000 seconds).

Wait after task finished
This is how long the scheduler will wait after the successful completion of a task. Consider the following example:
- You have a task that searches for the term “dogs” on Google.
- You set the Wait After Task Finished minimum to be 3000.
- You set the Wait After Time Finished maximum to be 5000.
- When you run your task, it will open up Google, search for “dogs”, and perform no other actions for between 3-5 seconds.
- After this time, it will perform the same task again.
Wait After Task Finished is an important parameter as you can use it to avoid “spamming” URLs and getting flagged as a bot.
Max Visits
This is the maximum number of site visitors you want to send to each URL you have specified. This is the number of visitors that you want to send to each URL.
Consider the following use case:
- If you put 100, each URL will get 100 visits,
- If you have 10 URLs and 100 max visits that means a total of 1000 visits before the campaign can be considered complete. The software will continue to send visits until the maximum amount of visits is reached.
Timeout
This is how long the application will attempt a single task before timing out. This parameter is measured in seconds. For example, if you input 60 here, each task will wait for 60 seconds when waiting for a page to load, or waiting for a specific element on that page to load.
This feature allows you to configure the devices you want to use for your automation or website traffic generation. Please refer to our dedicated documentation on configuring devices.
Tasks
This field determines how many parallel tasks will run at the time of execution. Here are some notes on what to expect when running tasks in parallel:
- A higher number of tasks means a faster execution speed but at the cost of more resource usage.
- Each PC has a hard limit on how many parallel tasks you can use.
- With an i7 or i9 processor and 16GB/32GB of ram, you can expect up to 70-120 parallel tasks on non-visible mode and 20-40 on visible mode.
- If your PC is not very powerful, try running 10 parallel tasks and see how it performs. You can gradually increase this number until you find an ideal number that balances speed and performance.
Visible Mode
This setting determines whether the browser is visible or invisible.
- Visible Mode: Each task will spawn a visible browser that will visit the website and perform the actions you configured under the Scripting tab.
- Invisible Mode: Each task will be completed in the background without spawning a visible browser, consuming fewer resources as a result.
Some important points to remember about setting the Visible mode:
- Visible mode uses more resources (x3) but it might be required for some websites.
- Remember to reduce the number of tasks if you run it in visible mode to keep the task stable.
Disable Images
Click this to disable images on browsers and improve performance. This is enabled by default.
Visit Mode
This setting determines the order in which you visit the URLs you set up in the Enter URL/URLs Manually or Load URLs from File section. You have two options:
- Shuffle
- One by One
Visit Mode - Shuffle
If you choose Shuffle, each task will get a random URL from the list of URLs.
Each task will get a random URL so one URL may get more visits than another. One of the advantages of this is that you can send mass traffic at the same time to multiple URLs.
Visit Mode - One by One
If you choose One by One each task will deliver the maximum amount of visits to one URL before moving to the next one. For example, if you entered 10 URLs and 100
max visits, all of the available tasks will deliver hits to the first URL until it reaches 100 visits before proceeding to the next URL.
Activate Search Module
This module will let you search for your keywords on the selected search engine.
Select your search engine and enter a single keyword per line in the text box.

Some things to remember when using this tool:
- We recommend only putting 1 URL when using the search module.
- Remember to put the trailing / at the end of homepages, eg. https://www.msn.com/
- We do not recommend using this feature if you do not have paid residential proxies. The proxies that are included with this product are free, public proxies. It will result in a lot of captchas being flagged. Check out our documentation on when to use rotating residential proxies.
If you can’t use the high-quality proxies we recommend, you can also send organic traffic to a URL using the referrer module and by entering google links containing keywords. Read about the referrer module here.
Advanced Search Options
Here you can modify the parameters used during the search module. The available options are as follows:
Try to search website till page
This is how many pages on Google, or the selected search engine, the application will iterate through after the search for the keyword is performed.
Click percentage on website if found
The percentage chance to click the website if the website is found for that keyword.
For example, if you put 5, it will be 5%. That means that only 5% of the tasks will click the website.
Duration to stay on each page of search result
You can supply a minimum and maximum value here. This is how much time the bot will stay on each page of Google before going to the next page.

Referrer Module
This module will let you modify HTTP headers and set a new referrer. The Referer header allows a server to identify a page where people are visiting it from.
For example, if you put https://www.facebook.com/ here, it will appear that a new visitor from Facebook visited your website. If you want organic traffic from search results with public proxies you can enter URLs like this on the referrer module:
https://www.google.com/search?q=keyword
https://www.google.com/search?q=another-keyword-here
https://www.google.com/search?q=keyword
Also, don’t forget to change HTTPS to HTTP if your website starts with HTTP.
Configuring devices
After clicking the Configure Devices button you will be shown a wide array of options.

Let’s discuss these options in detail, as a full understanding of them will enable you to use Epic Traffic Bot Pro to its full potential.
When you first open the modal, you will only see one device. This modal displays all of the devices you have created:

What is a Device?
In Epic Traffic Bot Pro we allow users to create their own devices which will be used to perform the automated tasks you set up. For example, you create an Android mobile device using our software, and use this device to visit websites, click ads, or perform any other automated web tasks you can think of.
There are some things to keep in mind before creating a device:
- You can create up to 500 devices each time.
- There are no limits on how many devices you can have in total.
- The 500 device limit is due to the amount of time it takes to create that many devices.
- If you need a high number of devices, you should create a device generator instead.
- If you want to customize how devices are generated you need to click the Advanced Settings button.
To create a new device follow these steps:
- From the Main screen, click the Configure Devices button
- Click on Add Device
- On the Add Device modal, select the type of device(s) you would like to create. The options are:
- Windows Desktop Devices
- Linux Desktop Devices
- Mac Desktop Devices
- Android Devices
- iPad devices
- iPhone devices
- Use the slider control to select how many devices you would like to create:

- Click Generate.
- You will now see your new device(s) the next time you click the Configure Devices button on the Main screen.
Here are some notes on Device Generators that you may want to consider before creating one:
- We recommend using Device Generators when you need a large number of devices.
- Devices Generators are created at runtime when the new task is created
- Device Generators are destroyed upon task completion. They do not remain in memory.
- If you want to customize how devices are generated you need to click the Advanced Settings button.
To create a Device Generator follow these steps:
- From the Main screen, click the Configure Devices button
- Click on Add Device
- On the Add Device modal, select the type of device(s) you would like to create. The options are:
- Windows Desktop Devices
- Linux Desktop Devices
- Mac Desktop Devices
- Android Devices
- iPad devices
- iPhone devices
- Use the slider control to select how many devices you would like to create:
- Click Create as Device Generator.
- Your device will now be created when your task begins.
This feature is for advanced users that want to create their own custom device.

Each of the fields available on this screen is explained below.
Navigator Settings

Allows you to choose what kind of navigator bypasses you want to apply to your device.
You can configure the following settings here:
Choose your Device Type
. The options are:
- Windows
- Linux
- Mac
- Microsoft Mobile
- Android Mobile
- iPhone Mobile
- Microsoft Tablet
- Android Tablet
- iPad Tablet
- iPod
- TV
- Consoles
Choose your User Agent. An example value here would be: Mozilla/5.0 (Windows NT 10.0; Win64; x64) AppleWebKit/537.36 (KHTML, like Gecko) Chrome/96.0.4664.110 Safari/537.36
Select your Platform. For example, Win32, or Win64
Select your Vendor. For Example, Google Inc.
Choose an Operating System. Eg. Windows NT 10.0; Win64; x64
Tab History Length.
Mobile Touch Points.
CPU Cores. How many CPU cores are required to perform your automated tasks.
Device RAM Memory. How much RAM does the device need?
Display Settings
Decide the screen resolution of your browser, the color depth, the pixel depth, and the scale.

Other Settings
You can decide if you want to activate persistence and spoof canvas, WebGL, or fonts.

Network Emulation
Allows you to decide the latency, download speed, upload speed, and connection type of your software.

Geolocation
You can set your device to spoof specific geolocation coordinates or not. For example, if you set the longitude and latitude to a location in South America, all the web traffic for this device will come from that region.

CPU Emulation
Decide if you want to emulate a slower or faster CPU by modifying the throttle rate.

PROXY
Configure your device to use a custom proxy instead of a global proxy.
Add Devices - Advanced Settings
The Advanced Settings screen allows you to finely-tune the settings used in the creation of your devices.

Let’s discuss the many options available here.
Browser Language
Choose if you want the software to use a random browser language, a custom one, or a predefined one like “Spain” or “Italy”.
Note: You will need to supply the correct browser language code here. For example, Spain = es, United Kingdom = en-GB.
Click this link to see a list of all browser languages permitted by our software,
Browser Timezone
Decide between a custom browser timezone, a random one, or have Epic Traffic Bot Pro automatically choose a matching browser language based on the browser language that the software chose during device generation.
To see a list of all browser timezones used by our software you can refer to this link.
Proxy Settings
This setting allows you to :
- Set the software to use a custom proxy.
- If you disable this feature the software will the proxies from the global proxy list.
- If you enable this feature the software will automatically pick a proxy that matches the browser language.
Consider the following example:
- You choose Spain as the Browser Language and match the browser language on the proxy settings.
- The software will automatically pick a random Spanish proxy.
Note: these are public proxies and should only be used to send traffic as they are easily detected by most websites. We highly recommend using paid proxies. Failure to do so may cause unexpected results.
Geolocation Settings
Similar to the Proxy Settings, you can disable this feature, use custom geolocation coordinates, or automatically match it to the browser language.

For example, if you put Spain in the browser language, the software will automatically choose random coordinates from Spain.
Fonts Spoofing
Determines whether Epic Traffic Bot Pro will spoof the fonts used on your browser to bypass the anti-bot detection algorithms of certain websites.
Fonts Spoofing Enabled:

Fonts Spoofing Disabled:

Canvas Spoofing
This setting allows you to spoof canvas drawings generated by your browser to bypass the anti-bot detection algorithms of certain websites.
Canvas Spoofing Enabled:

Canvas Spoofing Disabled:

Note: Canvas spoofing can break some websites.
Activate Persistence
Here you can tell the software if it should clear cache and browser history each time a task uses this device.
Activate Persistence Enabled:

Activate Persistence Disabled:

WebGL Spoofing
If enabled, the software will spoof the GPU used on your browser to bypass the anti-bot detection algorithms of certain websites.
WebGL Spoofing Enabled:

WebGL Spoofing Disabled:

Network Emulation
If enabled, the software will emulate a network condition different than your current one to bypass the anti-bot detection algorithms of certain websites.
CPU Emulation
Here you can tell the software if it should emulate a slower or faster CPU to bypass the anti-bot detection algorithms of certain websites.

Proxy
This section covers the Proxy functionality available in the Epic Traffic Bot Pro application.
What is a proxy?
A proxy acts as an intermediary between you and your network activity and can provide you with an extra layer of protection.
Clicking the Proxy option in the Epic Traffic Bot Pro Navigation Pane leads you to the Proxy screen. You can decide whether or not you want to use proxies here, download publicly available proxies, and purchase rotating residential proxies that are more suitable for big projects.
Note that if you already created some devices with proxies enabled they won’t use a proxy from this list.
Using a Proxy
If this setting is enabled by clicking the Use Proxies button, Epic Traffic Bot Pro will use the proxies you set up on this page.
Downloading Proxies
If you click this button a new window will appear. Here you can download free public proxies based on country scraped by our servers.
Keeping Proxies up-to-date
If you click this button before starting the program, the proxy list will get automatically updated with new proxies every 5 minutes.
Deciding between Free vs. Paid Proxies
When deciding what proxies to use with Epic Traffic Bot Pro, there are some important pieces of information to keep in mind.
Using Free vs. Paid Proxies
Free proxies, by the virtue of being free, are typically very slow due to the high columns of traffic they receive. Slower network speeds have a negative impact on the functionality of Epic Traffic Bot Pro.
Paid proxies on the other hand are dedicated, secure, and offer much higher speeds than that of free proxies. But there are many different paid proxies to choose from. Generally speaking, you can expect good performance with our tool if you decide to use any of the following proxies:
- Rotating lower quality residential proxies with unmetered traffic but limited to threads
- Premium residential proxies with limited traffic and with good ReCaptcha scores
- Rotating mobile 4g proxies
- Rotating datacenter proxies
- Fixed residential/datacenter proxies
However, if we were to select one type of proxy to recommend, it would be Rotating Residential Proxies.
Why we Recommend Rotating Residential Proxies
A rotating residential proxy will change or rotate your proxy for each request you make. This gives you extra protection from getting blocked by websites because your IP address is never the exact same. We recommend using higher-quality, rotating residential proxies when using the Activate Search Module feature. We don't recommend using this feature if you don’t have high-quality proxies. It will result in a lot of captchas being flagged.
Why you should avoid flagging Captchas {#why-you-should-avoid-flagging-captchas}
A Captcha test is designed to determine if an online user is really a human and not a bot. A Captcha may be triggered if user behavior seems to resemble a bot's behavior like if the users request webpages or click hyperlinks at a far higher rate than average. If you flag a Captcha, you will be identified as suspicious and potentially malicious. This could result in your IP address being blacklisted making it more difficult to perform the automated tasks you want using Epic Traffic Bot Pro.
Settings
Clicking the Settings button in the Epic Traffic Bot Pro Navigation Pane leads you to the Settings screen.
From this location you can tell the software to launch the browser with additional parameters, to set your 2Captcha API, or to load custom browser extensions that you can use in Visible mode.
Using 2Captcha API
If you want to solve Recaptcha or image captchas automatically, you to create a script that contains the "Solve Captcha/Recaptcha" scripting control and then put your 2Captcha API key here so that the software can communicate automatically with the 2Captcha paid service to solve them.
Chrome Visible Mode Extensions
You can put your custom extensions in the extension folder. They need to end with .crx or the program will ignore them.
These are typical Chrome extensions that you can download from the Chrome Webstore.
After downloading an extension, you need to place the associated .crx file under the extensions folder where Epic Traffic Bot.exe file is located.
Extra Command Flags
Clean Resources
Clicking this button will force close all chromedriver.exe and chrome.exe instances.
Troubleshooting
Welcome to the troubleshooting page. Here you’ll find solutions to the issues you may face when using our application. Many applications have protections in place against bots which can cause certain errors to appear. This page should help you work around or avoid these errors.
Getting Started
The errors you face can be a result of:
- User behavior
- System constraints
- Protections in place that defend against bots
We have sorted the errors into these categories:
- Registration Errors
- Common errors
- Critical errors
- External critical errors
- Permission issues
Registration Errors
These are the errors you may face when you attempt to register the software for the first time. Errors that can happen when you try to register the software
License is already bound to a PC
We only allow a license to be bound to a single PC at a time. You will need to reset your license or purchase a new license.
The credentials I was supplied with don’t work
This occurs if our application cannot find your credentials in the database. Please double-check that you are using the correct credentials from the email you received at the time of purchase.
If you are 100% sure that you are entering your credentials correctly, double-check that your internet connection works properly and that you don’t have a VPN or system-level proxies currently active on your machine.
If you still cannot log in, please contact support.
Object reference not set to an instance of an object
This error happens when the Epic Traffic Bot Pro has issues reading the processor ID or motherboard ID needed to create a unique string and to bind your license to the PC.
Usually, this error happens on virtual machines like VM-ware or Oracle, where access to this information is forbidden.
Common errors
This section covers some of the most common errors you can encounter when using Epic Traffic Bot Pro. Think of these error messages as warnings, they will not stop the software from functioning as intended.
unknown error: net::ERR_CONNECTION_RESET
This error occurred because the proxy connection reset while connecting to the web page. Connectivity issues can be fixed by using higher quality or paid proxies.
Check out our documentation on what proxies we recommend.
unknown error: net::ERR_PROXY_CONNECTION_FAILED
The proxy failed to connect. Connectivity issues can be fixed by using higher quality or paid proxies.
Check out our documentation on what proxies we recommend.
net::ERR_CERT_AUTHORITY_INVALID
The proxy failed to authenticate. Connectivity issues can be fixed by using higher quality or paid proxies.
Check out our documentation on what proxies we recommend.
unknown error: net::ERR_TUNNEL_CONNECTION_FAILED
Occurs because the internet is not available on the proxy, or the proxy is overloaded at the moment. Connectivity issues can be fixed by using higher quality or paid proxies.
Check out our documentation on what proxies we recommend.
timeout: Timed out receiving message from renderer: 60.000
Try reducing task count. This error happens when the GPU renderer hangs on a specific task.
Critical Errors
While common errors do not cause issues, critical errors could make the software stop working as intended.
unknown error: no chrome binary
This occurs when the chrome.exe file is missing from the installation folder. A rare error can happen when an antivirus decides to delete the chrome.exe file.
The file is 100% clean. You can whitelist it on your antivirus or disable your antivirus. You can get a fresh download complete with all necessary files here.
unknown error: chrome not reachable
Usually, this error happens when there is an issue communicating with the chrome executable. Try disabling your VPN or any other similar proxy applications that could interfere with the software.
Try to use device generators instead of fixed devices and lower your task count. See our documentation on device generators.
Some users reduced the chances of this error occurring by adding the –no-sandbox and –remote-debugging-port=9222 flags found under Settings before launching the software.
unable to discover open pages
A rare error that used to occur on older versions of the software. Please check that your software is up-to-date. If you encounter this error, please contact support.
This error means that the driver controlling the browser was unable to start on that specific port. Please check that you don’t have any VPN or system-level proxies on your PC running while you use the software.
If the error persists, complete a fresh install of the software using this link.
External Critical Errors
These are rare errors that can occur under specific circumstances.
chromedriver.exe – Application error
An external popup will appear displaying this error. When this happens it means there was a memory leak.
The possible causes for this critical error are:
- Epic Traffic Bot Pro was not installed under your user folder (Desktop, Documents, Downloads, etc). If it was installed somewhere like the C: drive, memory leaks can occur.
- A memory leak can happen if the software doesn’t have enough permissions to Read/Write on the hard disk to close the unused processes, or if it was installed on an admin permission level folder like Program Files.
- This error can also occur if you try to use more parallel tasks than your machine can handle.
Unhandled exception has occurred pop-up alert (Newtonsoft.Json)
The exception message will usually say Newtonsoft.Json binaries are missing.
- This error happens when you move the Epic Traffic Bot.exe file outside of the folder where the binaries are located.
- If you want to create a shortcut on your Desktop, right-click “Epic Traffic Bot.exe” and select the option Send to Desktop (create shortcut) option.
Permission Issues
If you see issues like:
- hanging chromedriver.exe and chrome.exe processes
- slow execution speed
You might have extracted the folder on a high permission folder.
We recommend extracting the folder to Documents, Desktop, or somewhere similar. Avoid extracting the .zip file on a high permission folder like Program Files.


